Sunday, August 23, 2009

When You Cut A Hole In The Roof........


Well, while I couldn't go into American Red Cross Disaster Relief mode due to the wimpiness of Hurricane Bill, he did prove beneficial late afternoon to this project.

At 5:15pm with Gosling 'Dark and Stormies' in our hands we went out to the porch to watch the rain begin from the Atlantic hurricane that blew out to sea. The rain is coming in skylight #3 and then 10 minutes later #2. Now, there isn't any metal flashing up nor shingles, but still......it would be great to know all the water resistant roof board and seam taping would have done a better job.

So, now we know where our trouble spots are. Thanks Bill!


Caulking

You just can't caulk enough. We're trying to hit things now while we can find the cracks and get them sealed up well before installing the clapboards. Thus ends a fairly productive weekend. Next up - more trim, clapboards, shingles, flashing, and hopefully that monster door!

Securing the Trim


J & B used the screw gun securing the facia board. Now that this piece of detail is up the drip edge for the roof can go on. 85D in the shade led us to postpone shingling until a cooler morning. So far no signs of Bill what so ever.

Skylights are Installed

The last two skylights went in this morning. We still have to add flashing as we install the roof shingles thus the orange tabs that are there to keep the windows from locking in with the frames. They will sit a little lower once that is finalized. Once again, lots of Grace tape to seal everything up. There is a terrific article in Fine Homebuilding that shows just how to install them and uses the same brand that we choose. Very helpful!

Scraping Wins Out

It does seem much better to scrape now before the shingles are installed. Unfortunately the paint spent the winter in the barn and is now a congealed mass that is destined for the dumpster necessitating yet another trip to Lowes.

Saturday, August 22, 2009

Taking Shape

So, after Saturday, 4 windows are in and one skylight has been cut out and placed, but not quite completed.

Tomorrow we'll do two more skylights if Hurricane Bill is really far out to sea, and maybe the roof.

Difference of opinion on steps to take on roof prep. Jen wants to chip and paint bad places on higher roofs so that paint chips and paint drips don't ruin the really nice new shingles. But there is that want to..... GET IT DONE! :)

First Skylight In

The skylight is temporarily in place until we get the roof shingles on when we'll add flashing to get a good waterproof seal.

Hole in the Roof

Time to cut a hole in that nice solid roof. After drilling some pilot holes in the corners, we got up topside and used a jigsaw to cut out the sheathing.

Windows


After viewing a This Old House how-to on their website, we decided we were adequately empowered to tackle our own installation. Once again the sticky tape comes in handy to seal up all gaps. The tape runs down the side of the opening and onto the sill. So if water penetrates the structure at the window area, it won't gather on the sill and rot it. So with the green membrane and the tape, we are insuring longevity.

The windows are true divided lights with an e-panel on the outside to provide additional solar gain. They are made by Brosco and are tilt outs which makes them easier to clean. They match the windows on the ground level.

The first window went in without a hitch! In fact, the sill opening was so perfect that 3 out of 4 windows went in and were level at bottom, side and diagonally. Only one needed a shim. Thanks Steve! Putting in 4 windows took us 30 minutes.

Trim


The first piece of trim has been installed. Thunder and potential tornados cut the work effort short though. This will be an ambitious weekend in that we aim to get the trim attached and install the windows. It sounds like Bill will pass fairly quietly to the east so we'll see how much we can manage.

Sunday, August 16, 2009

Speaking of Flat Surfaces

We chose the hottest day of the year to re-coat the drive with asphalt. It just seemed logical while we were refinishing floors indoors that the outside could use a sprucing up. We squeegeed 5 5 gallon pails of the stuff in two layers to get a smooth surface. Now we'll have to figure out how to get that dumpster out of there without damaging things!

Saturday, August 15, 2009

Dining Room too

We also refinished the dining room floor. It had a hard time drying due to the humidity and is still somewhat tacky. Nothing a big area rug can't cure.

Before / After

After four coats of an oil-based poly, here's how it looks. Going to gloss was difficult in that it does show any flaw. All in all though we are happy with the result.

Other Projects

Here are a few other projects we're fitting in while waiting for the windows. The kitchen floor was in rough shape - lots of scratches and a pretty dull finish. So off to Home Depot to rent a random orbital sander with 4 big discs. After 4 different sandpaper grades we got it to a point that we could start with the polyurethane.

Friday, August 14, 2009

Stone Placed


3/4 " stone placed in the trench. This is probably about 2 yards of stone.

We need a really nice rain storm to settle the stone and then I'll place the last loads on top. But this is a much better drain off the driveway than before.....and you know what R. Frost said about better drainage making better neighbors!

Mined stones removed....except the heaviest became a convenient border to the forsythia tree garden!

ACOE Project Finishing


Army Corps Of Engineers project complete. Weed barrier fabric anchored down with green plastic nails.

Tuesday, August 11, 2009

ACOE project


Here's the ditch running pretty full. The filter fabric will be anchored down with stakes and then be backfilled with the 3/4" stone. The good news is that the water is flowing off the driveway!

Leak, but at least it is small

Well today brought much heavier rains. A small leak has been spotted on the far wall. This is where the water is dumped from many roofs so there may be a bit of additional waterproof tape installation warranted.

Pick Up Day

Okay, not a lot of work today actually, none. But for good reason - after 7 1/2 weeks, the boys have finally returned home after a summer of camp. Lots of stories during the ride home and excellent memories of a wonderful experience! They were very surprised with all the changes - hopefully impressed as well.

Monday, August 10, 2009

Rain Tests the New Roof


After Brad finished putting the tape across the roof plywood seams today, Momma Nature tested it out. So far so good!

View from the road

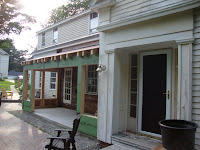
Things are starting to shape up. Here's the long view - hopefully the porch roof pitch is the same or very close to that of the dormers. The windows are in at the lumber yard so we'll be looking to install them soon.

Side project

You can't take on one project without starting another once you are underway. Jen's digging a ditch, literally, to drain the driveway. We had put some stone down a while ago but it became overgrown and clogged with soil and weeds. This time it's going to be dug down, lined with filter fabric and filled with 3/4" stone. The 2 hour task turned into a 3 day job. The soil is clay...so real you could make a pot out of it. Clay is the opposite of sand in that the particles are flat versus round so water has a hard time penetrating. To promote being a better neighbor, we are building the trench so by the time water gets to the tree line (ie property line) it has dissipated.

Along the way, she's found a few artifacts - an intact bottle and some metal pieces to something. But probably the most valuable find are all these rocks Jen has pulled out of the ditch, some of them weighing 75lbs. These rocks will help with project # 57....building a new rock wall to allow for the extension of the brick patio so when the porch french doors open out.....they open to an outdoor living room instead of a brick pathway. One project always creates another 3.

Dumpster

Not sure if we've posted much on the dumpster. It's getting close to full but there is still room for that stuff that has been weighing down the barn for too many years. This is about all that was left of the wall plywood (green stuff) - we cut it close on the quantity estimate but in the end there was just enough.

Sidewalls

The walls are green - kinda like last night's drink! This is 1/2" thick zip system plywood as opposed to the 3/4" on the roof. It is treated the same - with waterproof tape. We ran out though and are now using Grace brand tape which will probably negate the 30 year warranty.

Finishing the sheathing

Woke up a little groggy this morning but got back at finishing up the roof and sidewalls. Started out by cutting all the tails off the rafters to get a uniform length. Then, added block outs so the facia and soffit can be attached.

Sunday, August 9, 2009

We think it's sealed

The roof is all on with the special tape to make sure it is water resistant. As it is Sunday, we are celebrating with a green drink tonight. Jen has named it 'Screwed' which could be appropriate as we didn't have a nail gun so everything is screwed together which should mean that it is very strong. We'll see - it is still not quite square.

Skylight revisited

Here's a retake from yesterday with the roofing on. We'll cut it out when we're ready to put the windows in>

Roof seams

Here's the next part - all the joints get taped with a waterproof seal. Then all the screws that penetrated the board have to get a piece of tape too.

Roofing

Okay here's the roof system (yeah it's a system). First goes the plywood with a waterproof coating (the red stuff).

These 'sheets' weigh a frickin' ton. It was quite an ordeal to get these 8' x 4' sheets up on the roof. But we did it without injury and Brad only swore once. Me.......bit more.


rafters are finished


We placed the final rafters this morning. Things seemed to line up but we'll await the Foreman's comments when he returns from a whirl around trip through Maine with a side trip to Canada to see a very long covered bridge.

Saturday, August 8, 2009

Rafter Hangers

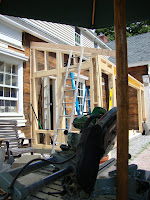
Here's are how we hang the rafters. A fancy joist hanger gets screwed into the header then we tie them in at the other end.

A True Skylight

Okay, here is the first skylight rough frame. Hopefully the rest will be similar and the actual windows will fit.

More Rafters

Rafters are going up. The problem is when you know the width of the skylights is 22 1/2" but you measure 22". That said, a little recalculation, handy sawzall, and we're off and running.

First Rafter

The first rafter goes up on the project. The next rafter will be the the one at the end of the roof. Once those two are in place, then it is time to sit down with a ruler and calculator to figure out how the rest of the rafters fit in place given the three skylights we will put up on the roof.

Note to engineers: Again...an old house that is no longer square. The distance from the first rafter to the last is different at the point it hits the house versus the point it ends rafter to rafter. Meaning....the porch construction is square, but where it hits the house is not.....because the house has settled. The difference is 1/4".